Vegan Recipes
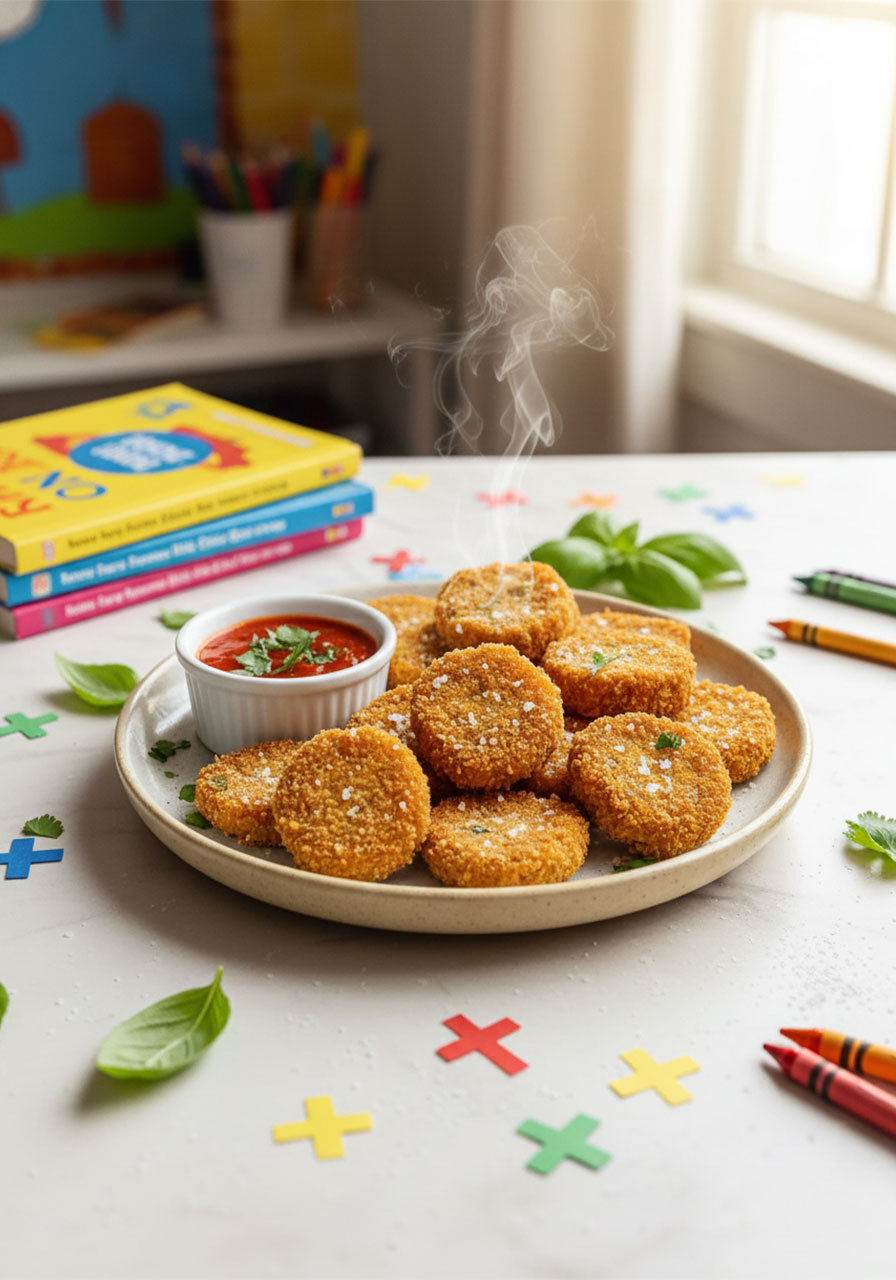
Crispy Vegan Chickpea Nuggets Your Whole Family Will Actually Love
May
Can I be honest with you for a second?
Some nights, I open the fridge and just stare. The kids are hungry. Dinner feels like a chore. And reaching for something easy – even if it’s not the most nourishing – starts to feel really tempting.
If you’ve ever been there, you are not alone.
That’s exactly how these vegan chickpea nuggets were born in my kitchen. My kids were asking for nuggets, I had a can of chickpeas sitting in the pantry, and a little creative nudge later – dinner was served.
And you know what? They went back for seconds. My meat-loving husband included.
These nuggets are golden-crispy on the outside, tender on the inside, and made from simple pantry ingredients you probably already have. They come together in under 40 minutes and are honestly one of the easiest wholesome meals you can put on the table.
Stewarding our health – what we put into our bodies and how we care for ourselves – is one of the most practical ways we can honor the life we’ve been given. And this recipe is a small, delicious step in that direction.
“Do you not know that your bodies are temples of the Holy Spirit?” – 1 Corinthians 6:19
Let’s get into it.
What You’ll Learn in This Post
- Why chickpeas make the perfect nugget base
- Exactly how to get that crispy coating every time
- Easy substitutions if you’re missing an ingredient
- The best dipping sauces and sides to serve with them
- How to store and reheat so they stay crispy
- Full step-by-step recipe at the bottom
Why These Chickpea Nuggets Are Worth Making
There are a lot of plant-based recipes out there. But this one keeps coming back to our dinner table – and here’s why.
They actually satisfy. Chickpeas are packed with plant-based protein and fiber, so these nuggets genuinely fill you up. No sad side of veggies trying to compensate.
Kids love them. The familiar shape and crispy exterior make these a hit even with picky eaters. My kids don’t even ask if they’re “the real thing” anymore.
They’re budget-friendly. A can of chickpeas costs less than $2. This is a whole dinner for your family without breaking the grocery budget.
They’re made from real ingredients. No mystery fillers. No unpronounceable additives. Just chickpeas, oats, and a handful of spices you already know.
They’re faster than you think. From pantry to table in under 40 minutes. On busy weeknights, that matters more than almost anything.
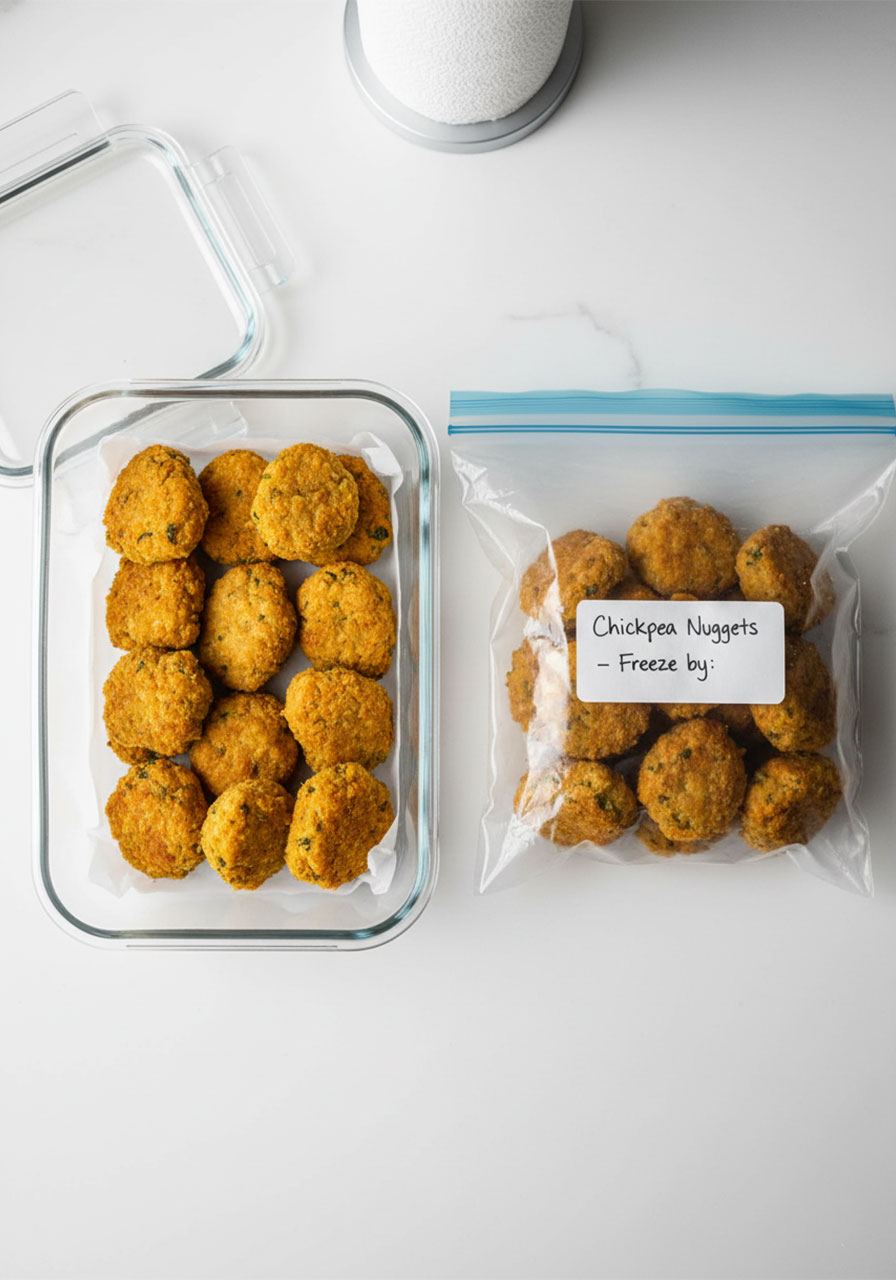
They freeze beautifully. Make a double batch and stock your freezer. Future-you will be very grateful.
What Kind of Chickpeas Should You Use?
The short answer: canned chickpeas are your best friend here.
They’re already cooked, they’re affordable, and they work perfectly in this recipe. Any standard 15-ounce can will do the job.
Here’s what to look for when you’re at the store:
- Choose chickpeas with no added salt if possible – it gives you better control over the seasoning
- Drain and rinse thoroughly before using – this removes excess sodium and helps with texture
- Save the liquid (aquafaba) from the can – you’ll use it as a binder in this recipe
- If you notice loose skins, remove them – this gives you a smoother, more cohesive nugget
Dried chickpeas cooked from scratch will also work, but honestly? Canned is the way to go for a weeknight dinner. Save that energy for something else.
Ingredients You’ll Need
Nothing fancy here. This is real food made from real pantry staples.
For the oat flour coating:
- 1 cup rolled oats (blended into flour)
- 1 tsp garlic powder
- 1 tsp onion powder
- 1 tsp paprika (red pepper powder)
- 1/2 tsp salt
- 1/2 tbsp nutritional yeast
For the chickpea mixture:
- 1 can chickpeas (15.5 oz), drained and rinsed – reserve the liquid!
- 1/2 tsp garlic powder
- 1/4 tsp salt
- 1/4 tsp poultry seasoning (or herb mix)
For air frying:
- Avocado oil spray (or any neutral cooking oil)

Easy Ingredient Swaps
Don’t have everything on the list? No stress. Here’s how to work with what you’ve got.
Rolled oats → Quick oats work just as well. You can also use regular or gluten-free breadcrumbs – just adjust the amount for the right consistency.
Nutritional yeast → You can skip this if needed. It adds a savory, slightly cheesy flavor, but the nuggets still taste great without it. Add an extra pinch of garlic powder to compensate.
Chickpeas → In a pinch, white beans can work as a substitute. The texture will be slightly softer, but the flavor is still good.
Poultry seasoning → Mix equal pinches of dried sage, thyme, and rosemary. Or just use Italian seasoning for a different but still delicious flavor.
Spray oil → Brush on regular cooking oil lightly. You can skip it entirely if using parchment paper, but the nuggets won’t crisp up quite as much.
How to Make Vegan Chickpea Nuggets (Step by Step)
This process is simple – four main steps and you’re done. Let’s walk through it together.
Step 1: Make Your Oat Flour
Add 1 cup of rolled oats to a blender.
Blend for about 30 to 60 seconds until you get a fine, flour-like powder.
Pour it into a bowl and mix in the garlic powder, onion powder, paprika, salt, and nutritional yeast. Stir well. Set aside.
This is your coating – and it’s what gives the nuggets that beautiful golden crust.
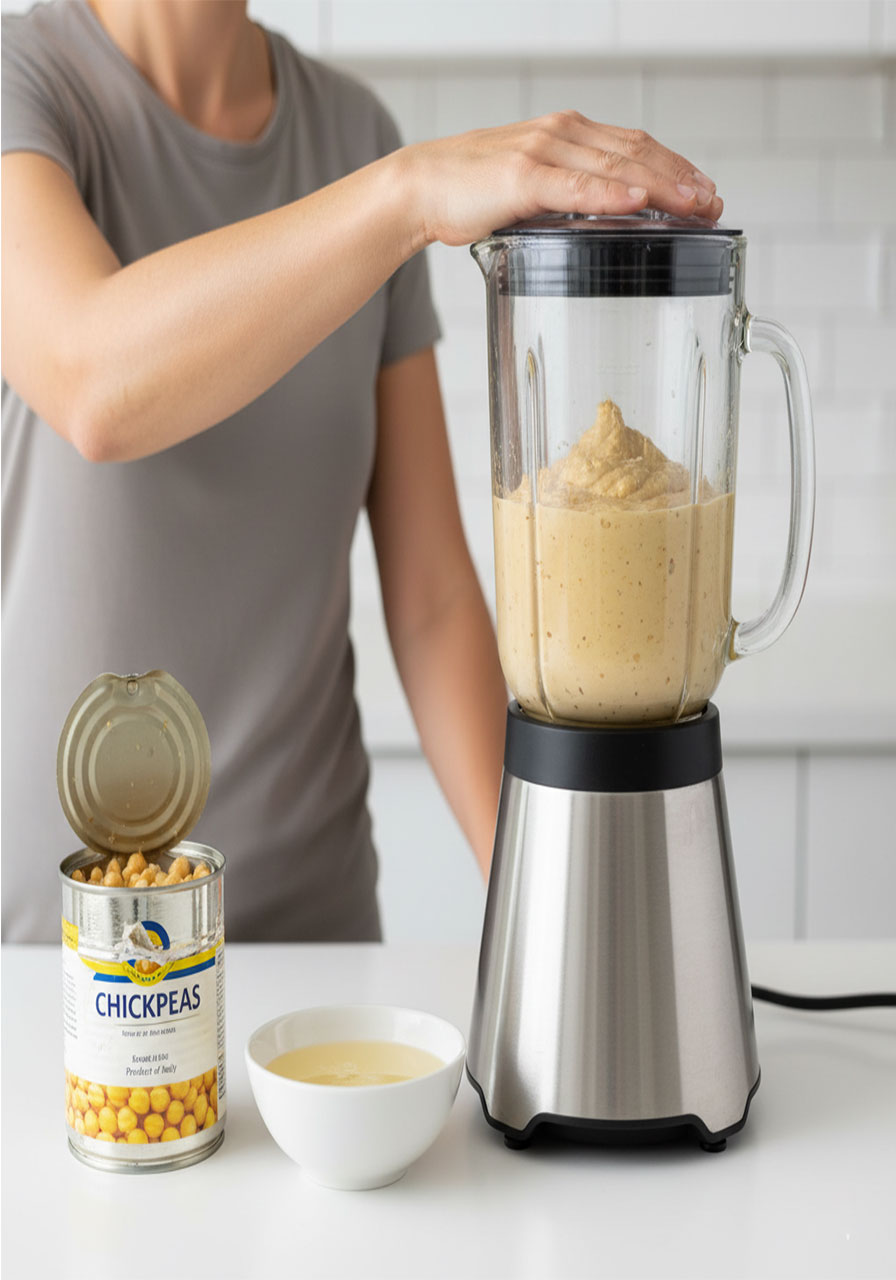
Step 2: Blend the Chickpeas
Open your can of chickpeas. Pour the liquid (aquafaba) into a small bowl – you’ll use this later.
Add the drained chickpeas to your blender along with the garlic powder, salt, and poultry seasoning.
Blend until the mixture is smooth and thick – think hummus consistency. You don’t want any whole chickpea pieces left.
Transfer to a bowl.
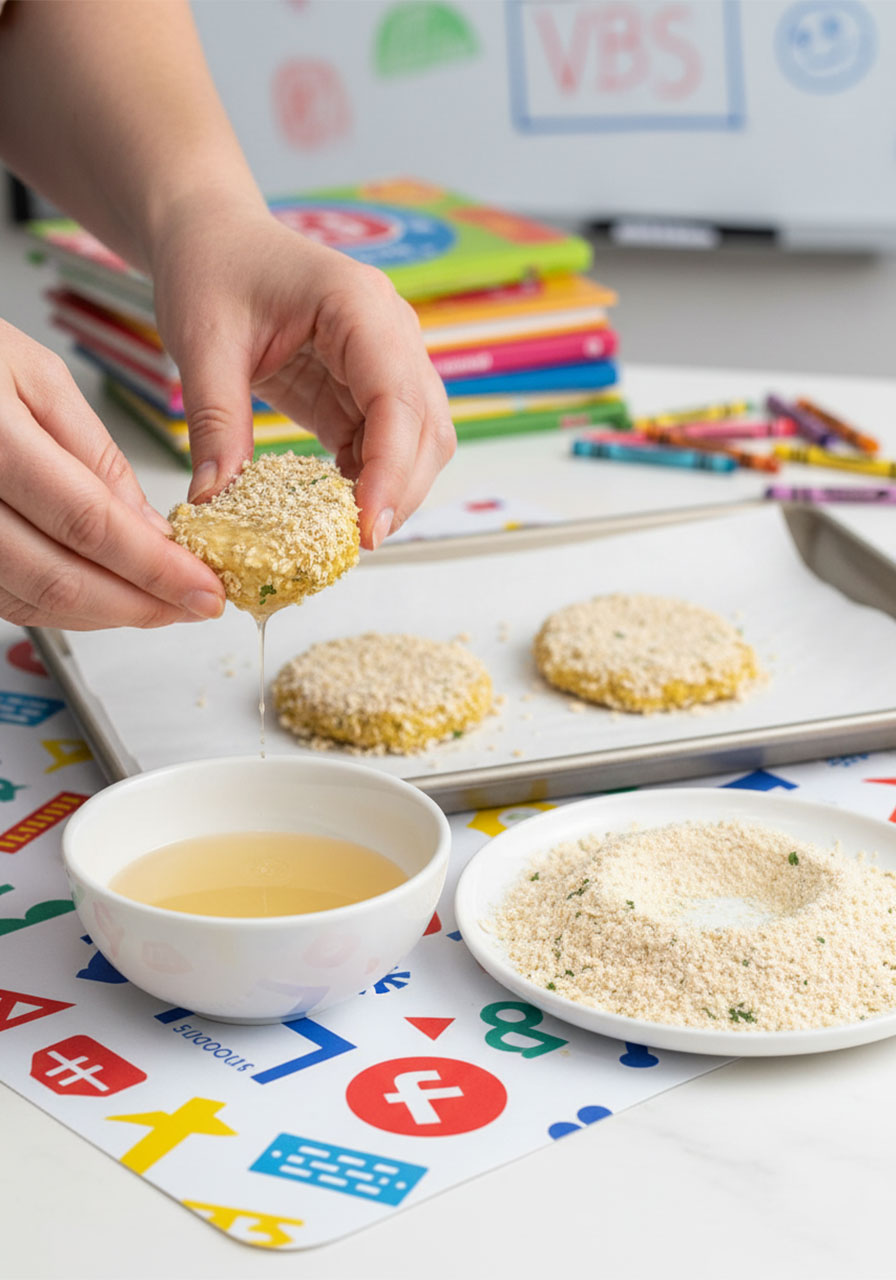
Step 3: Shape and Coat
Here’s where it comes together.
Scoop about one heaping tablespoon (15–20 grams) of the chickpea mixture. Shape it into a small nugget with your hands.
Dip it into the reserved chickpea liquid (aquafaba) to coat.
Roll it in the oat flour mixture to cover completely.
For extra crunch, dip back into the aquafaba and roll in the oat flour one more time. That double coating is the secret to a really crispy exterior.
Repeat until you’ve used all the mixture. You should get about 12 nuggets.
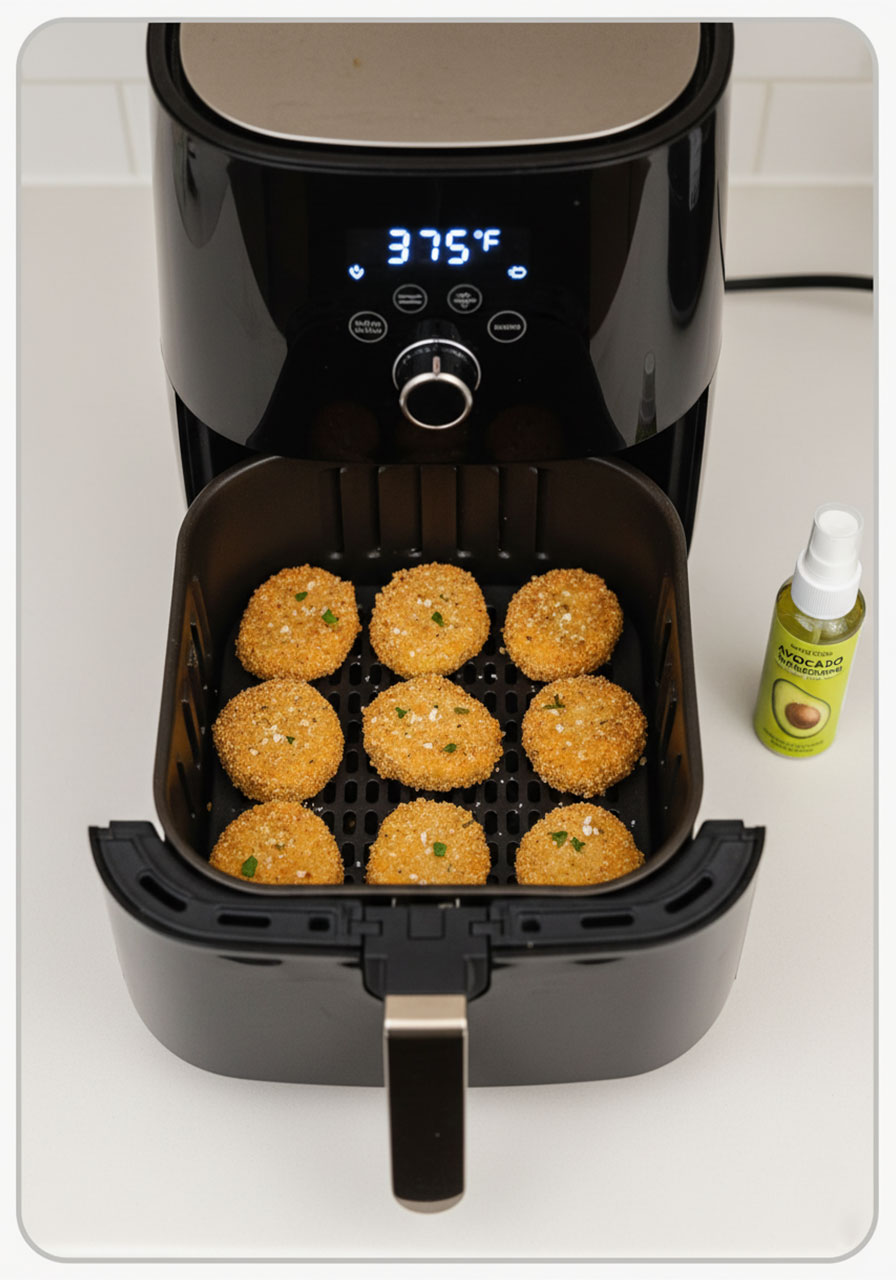
Step 4: Air Fry Until Golden
Preheat your air fryer.
Spray one side of each nugget generously with oil. Place them oil-side down in the air fryer basket. Spray the tops.
Air fry at 375°F for 10–15 minutes, flipping halfway through. Spray the tops again after flipping.
They’re done when they’re deep golden brown and crispy.
If you notice any white floury spots after cooking, give them a final light spray of oil – it fixes it instantly.
Let them cool for 5 minutes before serving. They’ll continue to firm up as they cool.
Common Mistakes to Avoid
These nuggets are easy, but a few small missteps can affect the final result. Here’s what to watch out for.
Not drying the chickpeas enough. Excess moisture is the number one enemy of a crispy nugget. After rinsing, pat them dry with a paper towel before blending.
Under-blending the oats. The oats need to be a fine flour, not just cracked or rough. If they’re too coarse, the coating won’t adhere well and the nuggets can fall apart.
Skipping the double coating. That second dip in the aquafaba and flour is what gives you that satisfying crunch. Don’t skip it.
Not flipping halfway through. Flipping ensures even crispiness on both sides. Set a timer so you don’t forget.
Skipping the rest time. Five minutes after air frying makes a real difference. The outside crisps up even more as they cool slightly. Give them that time before you dig in.
What to Serve With Chickpea Nuggets
This is honestly half the fun. These nuggets are made for dipping, and they pair beautifully with so many things.
Dipping sauces to try:
- Classic ketchup
- BBQ sauce
- Vegan ranch dressing
- Honey mustard (or maple mustard to keep it vegan)
- Sweet chili sauce
- Sriracha mayo (use vegan mayo)
Side ideas for a full meal:
- Baked french fries or sweet potato wedges
- A simple green salad
- Steamed or roasted broccoli
- Quinoa bowl with roasted veggies
- Coleslaw for a fun contrast
For packed lunches:
- Wrap them in a tortilla with lettuce and tomato
- Serve over a grain bowl with whatever veggies you have on hand
- Pack them cold with a little dipping cup of sauce – they taste great at room temperature too

How to Store and Reheat
One of the best things about this recipe is how well it holds up throughout the week.
In the fridge: Store in an airtight container for up to 4 days. Place a paper towel in the container to absorb moisture and keep them from getting soggy. They’re perfect for quick weekday lunches.
In the freezer: Let them cool completely first. Then layer them in a freezer-safe bag or container with parchment paper between layers. They’ll keep well for up to 3 months. A great meal prep option for busy weeks ahead.
To reheat and crisp back up:
- Air fryer: 375°F for 5–7 minutes – best method for restoring crunch
- Oven: 375°F for about 10 minutes
- From frozen: Add 3–5 extra minutes to either method above
Avoid microwaving if possible – they’ll lose their crisp exterior. But if it’s your only option, a quick minute is better than nothing.
A Faith Note: Nourishment as Stewardship
I think sometimes we forget that what we eat matters – not in a guilt-trip kind of way, but in a this-body-is-worth-caring-for kind of way.
Choosing to cook a wholesome meal from scratch, even a quick one on a busy Tuesday night, is a small act of stewardship. It’s a way of saying: I matter. My family matters. And the way we fuel ourselves reflects that.
You don’t have to have it all figured out. You don’t need a perfect diet or a pristine meal plan. You just need a can of chickpeas and fifteen minutes.
“She watches over the affairs of her household and does not eat the bread of idleness.” – Proverbs 31:27
That verse always encourages me. Not as pressure – but as a reminder that the small, faithful things we do in our homes carry real meaning.
This recipe is one of those small, faithful things. And it’s really, really delicious too.
Frequently Asked Questions
Can I bake these in the oven instead of the air fryer?
Yes! Bake at 400°F on a parchment-lined baking sheet for about 20–25 minutes, flipping halfway through. They won’t be quite as crispy as the air fryer version, but they’re still really good.
Are these nuggets gluten-free?
They can be! Just make sure to use certified gluten-free oats. All other ingredients in this recipe are naturally gluten-free.
My nuggets are falling apart. What went wrong?
This usually happens when the chickpeas aren’t blended smooth enough, or when the oats aren’t ground finely enough. Make sure both are fully processed before shaping. Also, the double coating really helps everything hold together.
Can I make these ahead of time?
Absolutely. You can shape and coat the nuggets and refrigerate them (uncooked) for up to 24 hours. Air fry when you’re ready to eat. Or cook a big batch and freeze – they reheat beautifully.
My kids are picky – will they actually eat these?
In my experience, yes! The familiar nugget shape and crispy coating go a long way. Let them choose their own dipping sauce – that always helps with picky eaters.
Can I add different seasonings?
Definitely. The base recipe is intentionally mild so it works for everyone. You can add smoked paprika, cumin, Italian herbs, or even a little cayenne if you like heat. This recipe is very flexible.
Is nutritional yeast necessary?
No – it’s optional. It adds a savory, slightly cheesy flavor that’s nice, but the nuggets are still delicious without it. If you don’t have it, just skip it or add an extra pinch of garlic powder.
What if I don’t have an air fryer?
Use your oven – instructions above. Or you can pan-fry them in a light coating of oil over medium heat for about 3–4 minutes per side until golden. Pan-frying gives a lovely crispy result too.
Closing Encouragement
You don’t have to choose between feeding your family well and keeping dinner simple.
These vegan chickpea nuggets are proof of that. They’re nourishing, satisfying, kid-approved, and genuinely easy to pull off – even on the nights when your energy is running low.
Every wholesome meal you put on the table is an act of love. For your family. For yourself. And for the body you’ve been entrusted with.
I hope this recipe becomes a regular in your home, the way it has in mine.
Save it, share it, and let me know in the comments how it turns out for you. I’d love to hear!
Explore more nourishing, faith-friendly recipes on the Christian Faith Goods blog.
A Short Prayer Before You Cook
Lord, thank You for the simple gifts – a warm kitchen, food on the table, and the hands to prepare it.
May the meals we make nourish our families and reflect the care You’ve placed in us.
Help us to steward our health with gratitude, not pressure.
And may even the smallest moments in the kitchen feel like an act of love.
Amen.
Crispy Vegan Chickpea Nuggets (Air Fryer)
Ingredients
Oat flour coating:
- 1 cup rolled oats
- 1 tsp garlic powder
- 1 tsp onion powder
- 1 tsp paprika
- 1/2 tsp salt
- 1/2 tbsp nutritional yeast
Chickpea mixture:
- 1 can (15.5 oz) chickpeas, drained and rinsed – reserve the liquid
- 1/2 tsp garlic powder
- 1/4 tsp salt
- 1/4 tsp poultry seasoning or herb mix
For air frying:
- Avocado oil spray or any neutral cooking oil
Instructions
- Blend 1 cup of rolled oats in a blender for 30–60 seconds until you have a fine oat flour. Pour into a bowl.
- Add garlic powder, onion powder, paprika, salt, and nutritional yeast to the oat flour. Stir well to combine. Set aside.
- Open the can of chickpeas. Pour the liquid (aquafaba) into a separate small bowl – you'll use this as your binder. Drain and rinse the chickpeas.
- Add chickpeas to the blender along with garlic powder, salt, and poultry seasoning. Blend until completely smooth, like hummus. No chunks should remain.
- Transfer chickpea mixture to a bowl. Scoop about 1 heaping tablespoon (15–20g) and shape into a nugget.
- Dip each nugget into the reserved chickpea liquid. Roll in the oat flour mixture to coat completely. For extra crunch, repeat: dip back in the liquid, then roll in the flour again.
- Repeat with all the mixture until you have about 12 nuggets.
- Preheat your air fryer. Spray one side of the nuggets with oil. Place oil-side down in the air fryer basket. Spray the tops.
- Air fry at 375°F for 10–15 minutes, flipping halfway through. Spray tops again after flipping. Cook until deep golden brown and crispy.
- Let cool for 5 minutes before serving – they'll firm up as they cool.
- Serve with ketchup, BBQ sauce, vegan ranch, or your favorite dip.